HelloPlayBook from FlashDevelop
If you haven’t already, read or skim through the FlashDevelop & PlayBook basics and set up your development environment. This includes installing the PlayBook SDKs and the FlashDevelop BlackBerry Tablet OS Template. Once you set up your development environment, it’s time to create a new project and write some code.
Create a New Project

- Launch FlashDevelop and create a New Project through Project > New Project in the main menu.
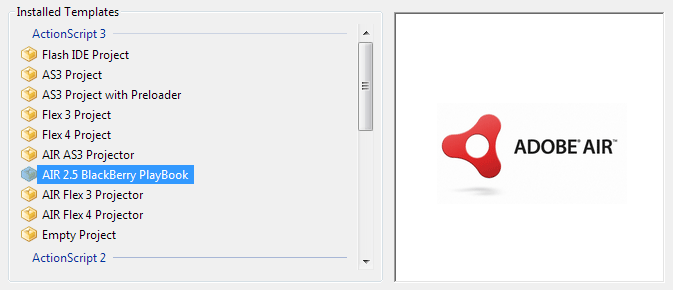
- Choose AIR 2.5 BlackBerry PlayBook from the template list (if you’ve installed the project template from the previous section).
- Fill in project name and project folder location.
- You can enter a package path as well, but it isn’t a required option. A common format is a reverse URI scheme (ex.
us.studiochris.HelloPlayBook).
- You can enter a package path as well, but it isn’t a required option. A common format is a reverse URI scheme (ex.
- If your project folder doesn’t exist, make sure “Create Directory for Project” is selected.
- Click the OK button.
- Change the following project settings using Project > Properties… from the main menu:
- In the Classpaths tab, add the locations of any external ActionScript classes you’d like to use in your project. You can also add sources from the BlackBerry SDK here to gain access to the special QNX UI classes (you can also load SWC files into your project’s lib folder to do the same thing – explained below).
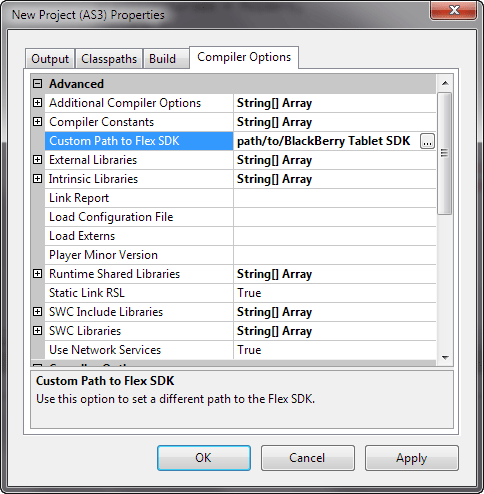
- In the Compiler Options tab, add the location of your BlackBerry Tablet OS SDK for the Custom Path to Flex SDK option. This is the only required change; however, you can also add libraries, SWC files, etc. here if you’d like.

- Click OK to save the settings changes.
- You’re all set to go!
Add QNX Components to Library
Adding the QNX components to your project can be done in a couple of different ways. I outlined one method in the other article, so here’s another method:

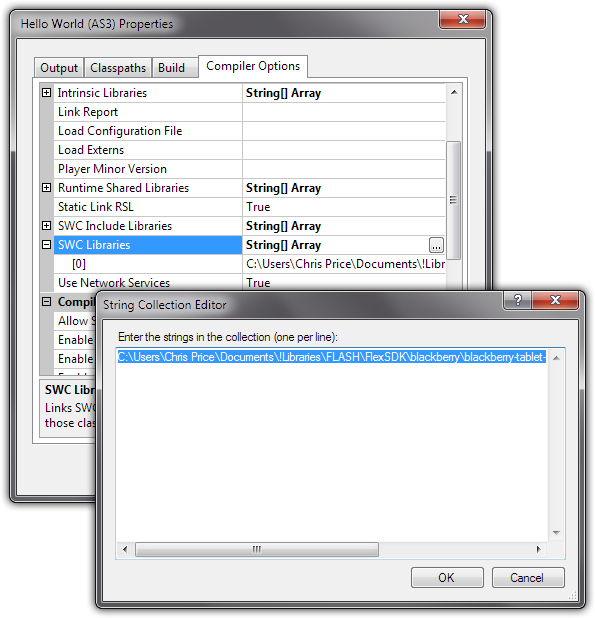
- Open the Project Properties again using the Project menu and find “SWC Libraries” in the list.
- Click in its field to the right; then click the More button (…).
- In the String Collection Editor window, add C:\path\to\your\blackberry-tablet-sdk-0.9.4\frameworks\libs\qnx-screen\qnx-screen.swc and click the OK button.
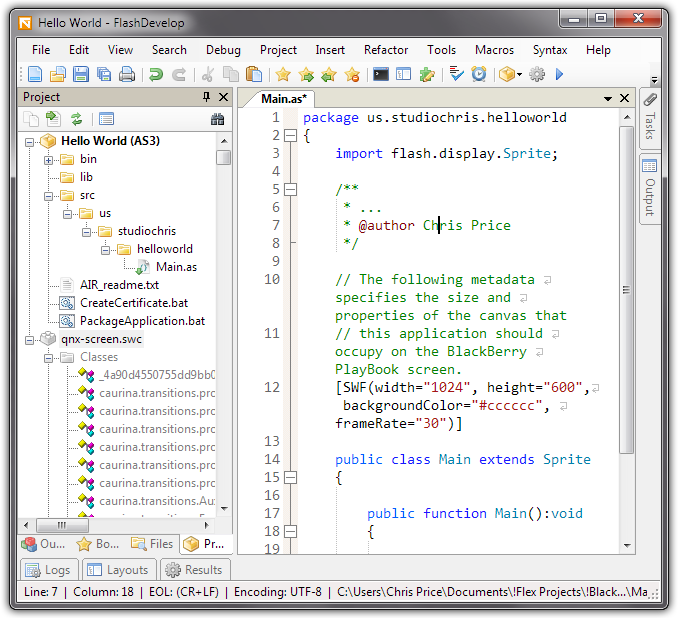
- You’ll see qnx-screen.swc added to your project, but not under the lib folder. Instead, it is linked to the project from the SDK location instead of being part of its source.

Prepare the Descriptor Files
PlayBook apps written with the AIR SDK have two different descriptor files. One is a standard AIR application descriptor. If you’ve used the FlashDevelop template provided, it will be in your bin folder and is called application.xml, though it can have any name. The other descriptor is specific to the BlackBerry SDK, blackberry-tablet.xml. The name for the second descriptor is required; do not change its name. The contents of blackberry-tablet.xml set your app’s icon, splash screen, your name as publisher and app category.
application.xml
- In the
idtag, place your app’s unique identifier. This can be as simple as the name of your app, but usually a reverse URI scheme is used. For my Hello World app, theidisus.studiochris.HelloPlaybook. Using the template, this is already filled in. - For
versionNumber, you can leave1.0.0or change it to any three-segment version number, with each segment containing no more than three digits. In other words, 0-999 are acceptable. Do not add another period and number. Three are required; no more, no less. filenameis automatically filled by the FlashDevelop template. For those not using the template, the filename is usually your app’s name with no spaces.- Next is
name, which is prefilled based on the FlashDevelop template as well. This can be changed to anything you wish. descriptionis a required element. If it is left out, the SDK’s packager will throw an error and not compile your app installation file. Describe your app in 250 characters or less here. 250 is a guess, but there is a limit to what the compiler will accept and 250 is somewhere close.copyrightis another required element. Place your copyright statement here. For example, I would type in© 2007-2011, studio|chris. All rights reserved.- All of the child elements in
initialWindowshould be fine to leave as is for those using the template.
Here is a copy of my final application descriptor:
<?xml version="1.0" encoding="utf-8" ?>
<application xmlns="http://ns.adobe.com/air/application/2.5">

	<id>us.studiochris.HelloPlayBook</id>
	<versionnumber>1.0.0</versionnumber>
	<filename>HelloPlayBook</filename>

	<name>Hello PlayBook</name>
	<description>Add a description</description>
	<copyright>Add a copyright statement</copyright>

	<initialwindow>
		<content>HelloPlayBook.swf</content>
		<systemchrome>standard</systemchrome>
		<transparent>false</transparent>
		<visible>true</visible>
		<minimizable>true</minimizable>
		<maximizable>true</maximizable>
		<resizable>true</resizable>
	</initialwindow>

</application>Code language: HTML, XML (xml)
blackberry-tablet.xml
initialWindowoverrides the normal application descriptor. The defaults from the template will be enough to move forward.- For
publisher, type in the name you used when signing up to become and App World vendor. It must be exact. If you haven’t signed up yet, be sure to come back and make the change once you have. - For the next section,
permissions(currently commented out in the template) you’ll set permissions for advanced functionality on the PlayBook tablet. Each permission will have its own element. Available permissions are:access_internet,access_shared,play_audio,read_geolocation,record_audio,set_volume_levelanduse_camera. More info can be found in the BlackBerry Tabet OS for Adobe AIR Development Guide, page 120. - The
categorynode can contain one of four values:core.internet,core.games,core.mediaorcore.utils. This will determine the app drawer section where your application is placed once installed onto the device. (The current template has a lot more choices, but only the four mentioned here are valid as of now.) - Next is your application icon in the
iconelement’s child nodeimage. Place the relative path of your 86 x 86 pixel, PNG format, app icon. If you place your icon directly in thebinfolder, just type in the filename of the icon. At the beginning of the project, you may not have an icon yet, so you can leave the default or leave it blank. - Lastly,
splashscreendefines the image that will show as your app opens on the device. Just like with icon, this should contain the relative path to the splash screen image. Splash screen images are full screen and should be 1024 x 600 pixels. Both JPG and PNG files are acceptable. Like the icon, you probably won’t have this prepared yet, so you can leave it blank.
More info can be found in the BlackBerry Tabet OS for Adobe AIR Development Guide, page 118. And the sample after some clean-up:
<qnx>
	<initialWindow>
		<systemChrome>none</systemChrome>
		<transparent>true</transparent>
		<autoOrients>false</autoOrients>
	</initialWindow>

	<publisher>studio.chris</publisher>

	<permission>use_camera</permission>
	<permission>access_shared</permission>
	<permission>access_internet</permission>

	<category>core.all</category>

	<icon>
		<image>blackberry-tablet-icon.png</image>
	</icon>

	<splashscreen>splash.png</splashscreen>
</qnx>Code language: HTML, XML (xml)
Write the Main Application Class
During the project creation stage, FlashDevelop added an ActionScript file called Main.as either in the root of the src folder or in the root of the package specified on the Create New Project dialog. As the name suggests, this is the main application class. You can always confirm which file is acting as the main class by its icon in the Project panel; it will be marked with a document icon and a green arrow. The starting Main.as file from the PlayBook template contains the following:
package us.studiochris.HelloPlayBook
{
	import flash.display.Sprite;

	/**
	 * ...
	 * @author Chris Price
	 */

	// The following metadata specifies the size and properties of the canvas that
	// this application should occupy on the BlackBerry PlayBook screen.
	[SWF(width="1024", height="600", backgroundColor="#cccccc", frameRate="30")]

	public class Main extends Sprite
	{

		public function Main():void
		{

		}

	}

}Code language: ActionScript (actionscript)
At this stage, the most important part of the file is the Main() function, which is the application constructor. This function will create your application instance and give you the main Stage to fill with your user interface. For this simple app, the UI will consist of one screen with a few of the components from the qnx-screen SWC. These are the recommended components because they are standard and have been optimized for the PlayBook. This doesn’t stop you from using your own components, however.
The Constructor: public function Main():void
- First, to make sure your app will be compatible with the both landscape and portrait aspect ratios, modify the main Stage instance to make sure it doesn’t resize in strange ways when the orientation changes.You will need to import a few classes for the values set in this block. ScaleMode, StageAlign and StageQuality. To import easily, place the caret (the flashy type-y thing [technical term]) either at the end of the class name, or inside of the class name and use FlashDevelop’s magic shortcut: Ctrl+Shift+1. The import will be done automatically and the class name should change to a teal green almost instantly. Once imported, type the period separator and the available property choices for the class will be shown from automatic code completion.
public function Main():void  {
    stage.scaleMode = ScaleMode.NONE;
    stage.align = StageAlign.TOP_LEFT;
    stage.quality = StageQuality.BEST;
}Code language: ActionScript (actionscript)- Next, the app needs a main layout container. The Container class from qnx-screen is the base layout component, so create a single container instance and add it to the stage.In this case, the import for the Container class will be automatic, without having to use the magic shortcut. As you type the class identifier after the variable name, code completion should show available choices for selecting the correct class. Choose qnx.ui.core.Container from the list and the import will be taken care of.
private var container:Container;

public function Main():void  {
    stage.scaleMode = ScaleMode.NONE;
    stage.align = StageAlign.TOP_LEFT;
    stage.quality = StageQuality.BEST;

    container = new Container();
    container.flow = ContainerFlow.VERTICAL;

    addChild(container);
}Code language: ActionScript (actionscript)