General

I’ll write more about it later, but as you can see, studio|chris is sporting a new look and a new logo. This has been in the works since February of this year between client work, so it is time to get it out there. Those of you visiting in Internet Explorer or Opera may see some visual glitches, but I’m working to get those ironed out.
For now, enjoy!
Chris
Since I updated to Windows 7, I’ve noticed a strange bug with my aging, workhorse Intuos 2 tablet (I know, I should update to Intuos 4 – or at least 3). The bug causes the Windows mouse pointers to change from the normal-sized Aero cursor theme to the Large or Extra Large theme. Small bug, but very annoying!
Here’s the Quick Fix
If you’re experiencing the same problem as me, the fix is to disable the menu strip at the top of the tablet’s work area.
- Open the Wacom Tablet Properties application from your start menu (or from the Control Panel).
- Select Functions from the Tool panel.
- Select Tablet Menu from the tabbed interface.
- For each of the 18 Tablet Menu Buttons, choose Disabled as the function.
- Enjoy using your tablet without the strange mouse cursor bug.

What about Intuos 3 and Intuos 4?
Other tablets in the Intuos line are apparently affected by this bug as well. Some in the Wacom forums have suggested that tablet buttons, touch strips and the new touch ring may cause the bug to appear as well. The updated driver released a few days ago may help solve the issue, but may not. I didn’t dig any further after fixing my own problem.
If you are affected and can’t find a fix, to change your mouse cursor back to the normal size, open the Mouse settings dialog from the Control Panel (simply called Mouse), select the Pointers tab and click the OK button to reset to your normal cursor theme.
Are there other solutions out there?
If any of you have any other solutions to the issue, or notice that the updated driver fixes the issue, add a comment to let everyone know.


It has been an exciting month and a half getting the new office ready. At this point, all of the major projects (except one that will wait) have been completed and the fun part has started – the decorating! I promised some updated photos, so here they are:
 |  |  |
 |  |  |
 |  |  |
 |  |  |
I’ll continue to move into my new, comfy office over time, but at this point, the space is completely ready for me to get started with new projects, courses and private tutoring. It really is exciting!
If any of you are in the Greenwood, SC area and would like to stop by, give me a call or email to set up an appointment and I’ll be glad to show you around! I’ll have my official grand opening on Friday, November 7 as part of Greenwood’s First Fridays. I’ll be in the office from 5pm to 8:30pm giving digital painting demonstrations and tours of the office and the rest of the building. Hope to see some of you there!
140 Maxwell Avenue · Studio 12 · Greenwood, SC 29646
Oh – and one additional note – NEW BUSINESS CARDS!

You’ve heard me talk about it over the last few blog posts, so here are some snapshots taken on October 3, right before leaving for the weekend of seminars, meetings and workshops with Marilyn Sholin at her ASTA Workshop. Of course, since then, things have progressed along nicely, but keeping with the actual timeline of progress, those pics will come later.
 |  |  |
 |  |  |
 |  |  |
 |  |  |
At this point in time, some of the furniture was in place, the cabinets were assembled, but only partially hung and the dividing gallery wall was nothing more than a drawing, some cable curled inside a flower urn and some masking tape on the floor. It is fun to look back at some of the beginning stages of this process.
Since it is blurry above, here’s the design on both doors – can’t leave any details out:
The Grand Opening
Coincidentally, the Grand Opening of Meridian was also on October 3. While I would have loved to have been there, as mentioned above, I had to be in Asheville, NC to attend a couple of workshops and teach the Blogging with WordPress for Creative Professionals workshop (the next one is in planning) – details on the workshops coming up!
For a short article on the Grand Opening and Ribbon Cutting Ceremony, check out Greenwood Today.
In the last post, the original measurements were transformed into a working floor plan using a scale drawing created in Adobe Illustrator. Before I post photos, let’s take a virtual walk through of the layout along with some explanation of some of the creative solutions used to maximize the space in the studio.
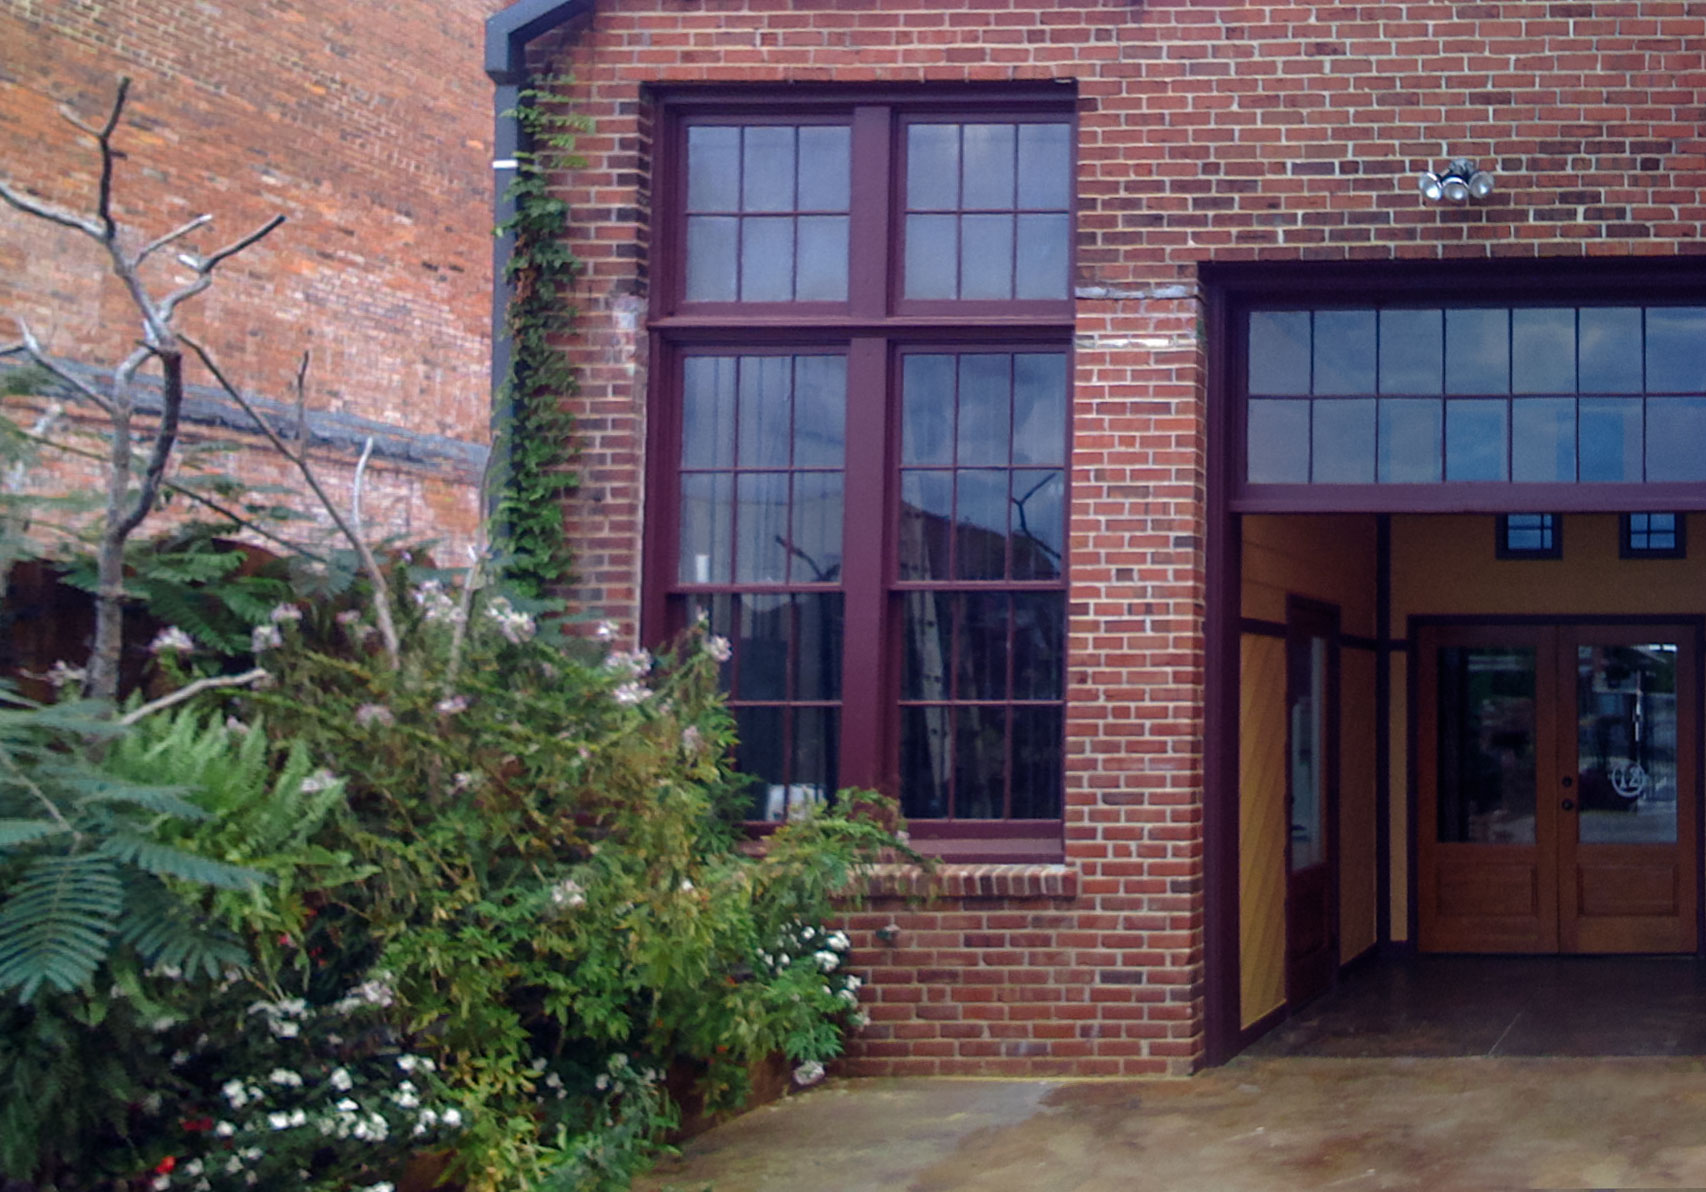
The Lobby
Stepping in through the front door, I established a “lobby” area outfitted with a lamp, a comfy, oversized ottoman with storage inside (the space is small – storage in every nook and cranny is very important to maintain a neat space), a plant for a bit of softness and a small decorative file cabinet, coordinated to my desk, that also serves as a magazine stand and end table. My studio also happens to hold all the utility hookups for the entire building that had to be hidden, so I chose a freestanding screen with circular mirror accents and decorative urn with an 8′ tall natural arrangement to disguise those.
Still following the design and move-in process at Meridian, I left the last post with a very important tip for beginning to design any space – take measurements! So after that, what’s next?
For me, a scale drawing was the next logical step. After taking all of my measurements, I realized the space is smaller than I originally thought, which brought a challenge in which furniture and cabinetry to choose and just how to pull together such a multifunctional space in such a small area. Being a graphic designer, I looked into my digital toolbox and chose Adobe Illustrator (also available in Creative Suite Design Premium) for the task. Sure, it isn’t making a poster, designing a website layout or a great new logo, but Illustrator’s capabilities with precise, scalable measurements makes it the perfect choice for a little impromptu room planning and interior design.
The first step in setting up the new office at Meridian was, obviously, to clear out all the clutter and transform the space from a storage closet into a usable room. Luckily, I didn’t have to be involved in that process, but I did start working before everything was cleared out. You may be asking, “What were you able to do with all that stuff in there!?” The answer is… not much, but at the same time, probably one of the most important jobs in preparing the space – measuring everything.
The studio isn’t huge, so good measurements were the key in being able to plan everything out. I’ll admit, it was tough climbing over all the obstacles, but the end result was everything I needed to begin.
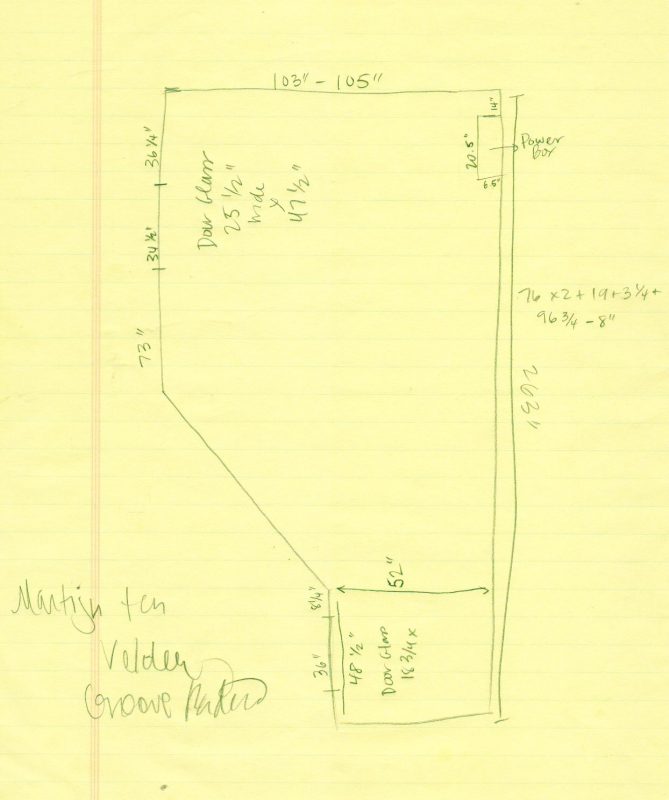
Of course, the initial drawing wasn’t to scale, but the drawing (and the random scribble taken from my radio listening) isn’t the important part – the measurements are. The drawing helps to visualize the different measurements and how they relate to the shapes of the room, though. I wasn’t able to reach the angled wall, but no worries, the scale drawing to come later filled in that measurement for me quite painlessly.
Note to all who are designing a studio space inside of an existing room – take accurate measurements! The space may appear larger than it actually is, which became my first roadblock.
It is official – Studio|chris is opening a physical office location in Greenwood, SC! This is a HUGE step and I’m happy to be able to share it with all of you!
The brand new office is inside of a building named Meridian at 140 Maxwell Avenue. The space was established as 12 studio spaces for artists, and I was lucky enough to be able to pick up the last remaining studio in mid-September. Since then, thing have been a mad dash to equip the studio with furniture, cabinetry and all the other necessities to create both an office, gallery, meeting space, and a small classroom for private tutoring in all of the Adobe Creative Suite applications and Corel Painter X
.
So let’s take a look back to September 15, 2008 (pics courtesy of the iPhone):
 |  |  |
 |  |  |
The space was being used as a storage closet for the building. Lots of miscellaneous tools, hardware, appliances and decor was scattered absolutely everywhere! Even though it was packed to the ceiling with stuff, I knew this studio was special and would become the home of Studio|chris. Although a little blurry in the photo, take a look at this fabulously aged concrete floor:

Over the next few days, I’ll be posting a series detailing the move-in process, all the events that took place after the room left its storage closet past behind and a few details about the building and my new neighbors!
I’ll also take a little time between posts to catch up on some of the events that have taken place, outside of the office, in the past month – including the awesome weekend of workshops with Marilyn Sholin.
UPDATE: The Studio|chris Brush Installer has been discontinued and is now the Studio|chris Brush Manager. This post exists only as an archive. The integrated installer and download links for the Brush Installer have been changed. To install the new, free Brush Manager software, visit the Brush Manager’s main page.
Behind the scenes, I’ve been working on the next version of the Studio|chris Brush Installer. The 0.6 beta branch will bring a lot of changes and increased functionality. A release date hasn’t been set, but here’s what to look forward to!
A New Interface
The first thing you’ll probably notice is a new interface that is customized especially for the application. Things are still as simple as the original as far as installing brushes – simply drag and drop your brush ZIP file on your OS box and the installer takes care of the rest.
The new interface is standardized over all operating systems, so Windows and OS X users will see the exact same interface. The screenshot below isn’t complete, but is a working prototype of the new interface.

A New Name
With the next release, the Studio|chris Brush Installer will become the Studio|chris Brush Manager. The Brush Installer name is going away in the next version for two very good reasons:
- Documentation Confusion: “Have you installed the installer correctly using the install button on the website?” Yeah, I’m scratching my head too and I wrote the thing! The new Brush Manager name will help avoid this type of confusion.
- New Features: The new feature set for the application really expands the application to be more than just an installer, so the new name encompasses those new features and also future improvements.
The new name is set in stone for the foreseen future of the application.
A New Feature Set
I mentioned some new features in the previous section. Here are some of them:
- Settings panel accessed by clicking the new Settings button (wrench icon) in the title bar. That messy Vista UAC checkbox is going in there with a lot of other options.
- Install brushes to Painter 7 through Painter X.1, even if you’ve customized the location of the Painter Brushes folder (ie. “I install all of my applications to D drive instead of C drive.”). This will also bring support to Windows Vista 64-bit. Thanks Les and Sue.
- Automated updates, not to be confused with automatic updates. Updates will no longer require visiting the website to install the new version. For updates to 0.6 and beyond, just open the settings panel and click the update tab to check for and install updates.
- The new Manage Brushes tab (will not be active in 0.6) contains functions to backup, delete, deactivate and reactivate brush categories. The Manage Brushes tab will become active in version 0.7 for users who wish to purchase an upgrade package. The Install Brushes tab will always remain free.
- In the background, and included as part of the new settings, you may choose to activate “logging” to log where files are being placed while using the Install Brushes tab. This will be useful in troubleshooting.